3-Step Guide to Unlocking Benefits of Android Push Notifications
Previously, we showed you how to start unlocking benefits of iOS push notifications with our 4-step how-to guide. Now, we will continue with Android push notifications using Firebase Cloud Messaging. Push notifications can have huge benefits for mobile app user engagement. An average of 62% of users will re-open the app the following month when a push message encourages them to do so, according to Loyalitics.
And push notifications for Android Apps can be even more impactful than those for iOS! A recent study from Leanplum found that Android is four times more powerful than iOS at engaging users via push notifications. To add push notification capability to your Android app, you’ll use Firebase Cloud Messaging.
1. How Firebase Cloud Messaging (FCM) Delivers Notifications
Firebase Cloud Messaging (FCM) is a messaging solution that lets you reliably deliver notifications to Android apps. Using FCM, you can send notification messages to drive user reengagement and retention, or to notify a client app that data is available to sync.
An FCM implementation is an integration of three parts:
- A back-end application (app) server, such as an internal company system
- A mobile app that receives notifications (on an Android device)
- The FCM service itself that delivers the messages
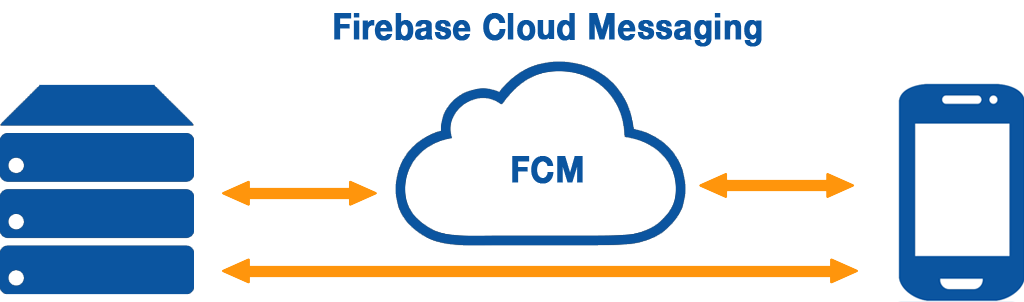
The app server is likely to be some existing back-end system internal to the company. This server may already be serving internet traffic, however there are a couple more things to keep in mind. The app server will need to communicate with both the FCM service and the app directly. The app server is required to store information securely so as not to expose any tokens or keys that are involved in the integration.
Android Studio makes setting up FCM for you Android App easy! In this article, we will get your FCM account setup as well as get the development environment for your Android App prepared in 3 easy, fail-safe steps.
2. FCM Console Setup
Signing in to the Google Firebase Cloud Messaging Console (the FCM Console) is the starting point. A Google Account is required to sign in, so you will need to sign in to your existing Google account (or create a new one.) FCM is free to start using.
After signing in, there are some background setup steps that will occur (that you won’t be able to see, other than the logo with a progress bar). After a moment, you will arrive at the start page, which will look mostly empty for now.

You’ve now finished the FCM Console Setup!
3. Development Environment Setup
In the attached guide, we are going to be using the latest Android Studio release (at the time of publishing this is Android Studio 2.3 Beta 4). This is available from the Android Studio Beta Channel.
If you already have Android Studio installed, you may be able to use your existing version, however the instructions may be slightly different.
With Android, you’ll be able to use the emulator (a part of Android Studio) to receive those notifications. To note, this is different than with iOS, which requires a physical device to receive push notifications.
Integrate Android Studio with Google Firebase Cloud Messaging
You’re now ready to download the attached guide to integrate an Android Studio project with Firebase Cloud Messaging!
You’re now ready to download our guide to integrate an Android Studio project with Firebase Cloud Messaging!