Getting started with continuous integration for iOS using Ship.io
Continuous Integration (CI) is tremendously valuable to an agile development process, but also require some upkeep that’s always felt “costly” to me (and annoying, as I’m generally lazy when it comes to “sys admin” tasks).
UPDATE October 6, 2015: I’m sad to report that Ship.io is shutting down as of October 30, 2015. You can read more about it in their blog post. It’s a shame Ship.io wasn’t able to sustain their great offering, but at Arter Mobilize the CI must go on, so we’ll be looking for a replacement service. I’ll be sure to chronicle the next chapter in our CI adventures here.
On a recent iOS project we started using Ship.io for CI, and in this post I’ll describe what it took to get started.
But first, some background. My vision for our iOS Continuous Integration toolchain was something like …
I wanted a CI environment that would:
- Be able to build an iOS project without requiring me to recall all the details of running Xcode from the command line (having done this with Jenkins for CI in the past, I wasn’t in a hurry to repeat the experience)
- Trigger a build when we push updates to our source code repositories hosted on BitBucket
- Sign the App for installation on test devices
- Include Fabric.io for crash reporting (re: Crashlytics), and automatically publish builds to Crashlytics Beta for distribution to testers
- Keep those who need to know informed of build status (primarily the developers), but not overflow inboxes with build notifications either (a Slack channel seemed like a good approach for this)
- Not require me to host my own CI server (again, not eager to sys admin my own environment)
Happy to report that Ship.io has been a great success so far. The first steps in getting our iOS CI process up and running was to create our Xcode workspace, and Git repository on Bitbucket, and use those to create a build job.
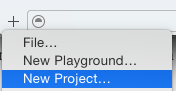
If you’re not familiar with them, an Xcode workspace is a document that groups projects and other resources so you can work on them together. A common use of a Workspace is to group Cocoapods dependencies (code modules referred to as “pods”), but if you’re not using an external dependencies (because you’re, you know, into re-inventing the wheel). you may have solo Xcode projects. Creating a workspace in Xcode, is pretty simple: just File > New > Workspace. Then click the ‘+’ button in the left-side Navigator pane, and choose “New Project…” to create your iOS App project.
Next, add the Xcode workspace to a Git repository. Ship.io provides tighter integration with GitHub and BitBucket – i.e. you can provide your account credentials, and Ship.io will scan for repositories automatically. This is convenient, but even for us although we host our repositories on BitBucket, I’m not the owner (we have an “Artermobilize” account for that), so scanning for repositories that I own was not particularly useful. Fortunately, you can add any Git repository using HTTP or SSH. In our case, we had a Private repo over HTTP. Once this is set up, we’re ready to create a new build job by clicking “New Job” in the Ship.io dashboard, and entering the repository details:
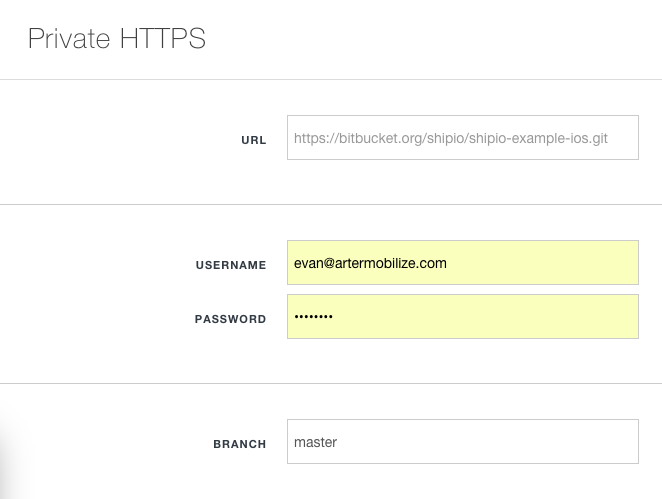
You need to specify the branch that Ship.io will monitor so builds are triggered when changes are pushed. This defaults to the “master” branch, but can be configured to any branch, based on your Git branching strategy. After entering your repository details, click “Scan,” and Ship.io scan the repository to make sure it contains an Xcode Workspace.
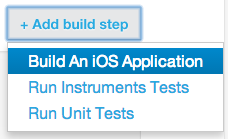
Next, click on “+ Add build step” and select “Build An iOS Application”
If all is well, you should see the Xcode project from your workspace, and a default scheme in the “Project Configuration” tab.
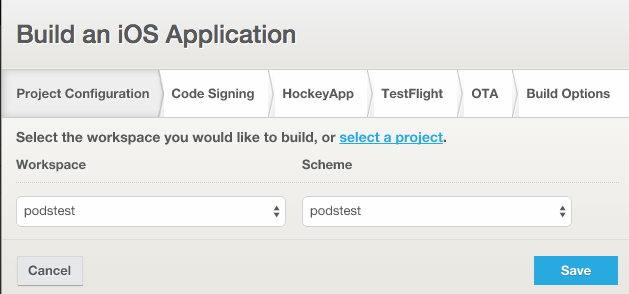
If the scheme list is empty, check out this Ship.io help article on “Schemes are not detected.” Click Save to finish adding the build step.
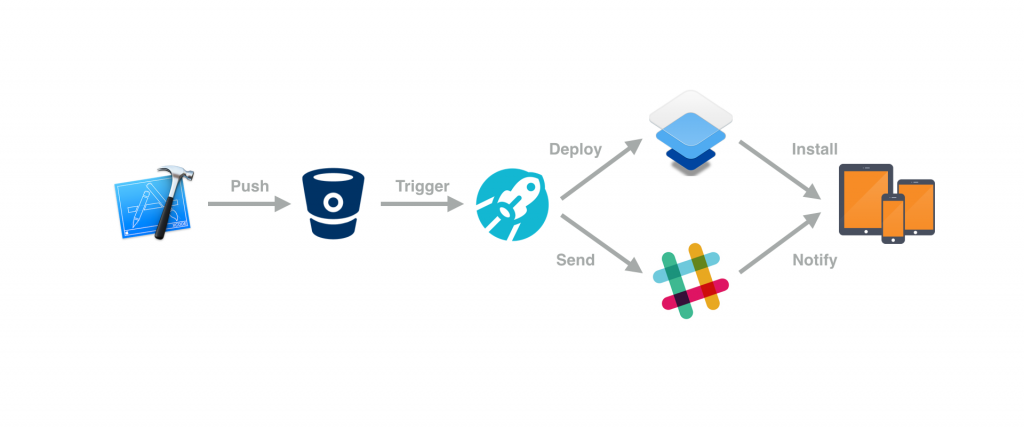
Now, after just that, we have a build job that will be kicked off each time a commit is pushed to the configured branch of the Git repository – I’ve already realized half my vision of painless iOS CI! In my next posts I’ll describe the step necessary to setup code signing, distribution using Crashlytics, and configuring build notifications using email and Slack.